The Vault Professional Form Designer allows you to customize the arrangement of work item fields on Vault Professional Item Tracking Add New Item and Modify Item forms. The Vault Professional Admin can add sections to the form and can also remove, add, and rearrange work item fields within the sections.
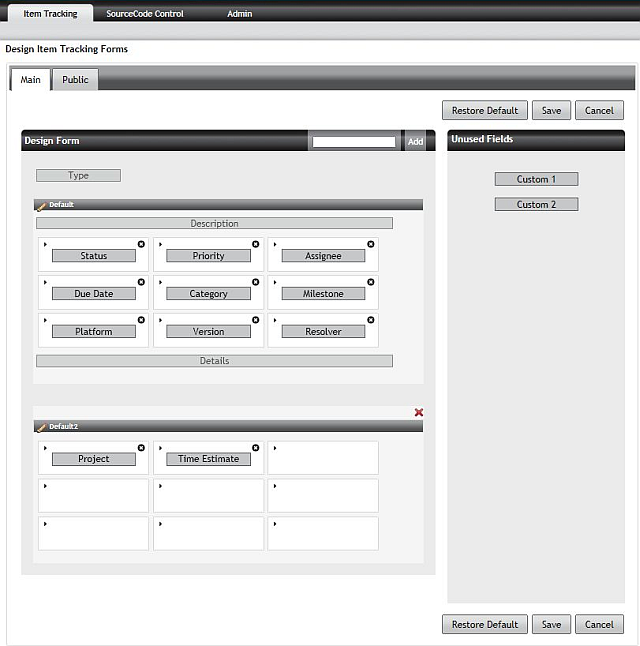
- Design Form
-
The Design Form area is divided the Main and Supplemental sections. Sections can be added or deleted, except for the Main section.
The Design Form page has two tabs, Main and Public. The layout in the Main tab is visible to all users except for users assigned to the Public Group. Users in a Public Group will only see the layout shown in the Public tab. Public Groups can be configured in the Admin Web Client in Item Tracking Project options. The Public tab layout will also be used for the External Add form.
The Unused Fields sidebar holds fields that are not currently displayed on the work item form. With the exception of the Type, Description, and Details fields, work item fields can be added to, removed from or moved in the form designer.
- Sections
-
By default, each Design Form section has nine field entries arranged in three rows of three fields. This layout corresponds to the order in which the fields will be displayed on the work item view in the Vault Professional Web Client.
In Vault Professional GUI Client work items, the Main section (as configured in the form designer) and its associated fields comprise the upper portion of the work item form. The Supplemental section and any additional sections created by the form designer will appear as tabs in the lower left of the work item form.
- Add Section
-
To add a new work item section, type a name for the section in the Section name box on the Design Form bar, and click Add.
- Delete Section
-
To delete a section, click the X at the upper right of the section. Any fields which were displayed in the deleted section will be relocated to the Unused Fields section.
- Fields
-
Fields can be removed, added, or moved within the form.
- Remove a Field
-
To remove a field from the form, click the X at the upper right of the field name. The field will move to the Unused Fields section.You can also click on the field and drag it to the Unused Fields sidebar. Removing a field removes it from the view, not from the database.
- Add Field
-
To add an existing field to the form, click on a field name in the Unused Fields box. Drag the field to the Main section or another section in the form. Up to nine fields can be added to each section. To create new fields use Customize Item Tracking Fields in the Vault Professional Admin Web Client. The new custom field will be added to the Unused Fields sidebar and from there it can be moved into the form designer.
- Move Field
-
Fields can be re-arranged on the form. To move a field, click on a field name in the layout of the Main or other section, and drag it to the desired location. If there is already a field in that location, that field will move to the Unused Fields section.
Note
Fields using the Textarea type require different placement than described above. A Textarea field must be placed in the first cell of a row in the Design Form cell table, and must be the only cell in that row. This is because a Textarea field uses the full width of the work item section, similar to the Details field.
- Unused Fields
-
The Unused Fields sidebar allows you to set aside fields that will not be visible on the work item form. All fields not currently in use on the form grid are displayed in Unused Fields Sidebar.
Database fields from the Design Form section can be removed from the form and stored in the sidebar. Items in the Unused Fields sidebar can be added to Design Form by dragging them from the sidebar to the form.
- Save
-
Click Save to save the changes to the form.
- Cancel
-
Click Cancel to undo changes to the form.
- Restore Default
-
Click Restore Default to return the form to its default layout.